DIY Bookmarks from a Gift Bag: No-Waste Floral Craft Ready in 10 Minutes
- Kimberley Rogan-Walker

- Jul 16
- 6 min read
If you have ever been left with the narrow side pieces of a beautiful floral gift bag after using the main panels, this tutorial is for you. Instead of dropping those pretty offcuts straight into the recycling, you can transform them into four gorgeous laminated floral bookmarks — completely free, in under ten minutes, with materials you almost certainly already own.
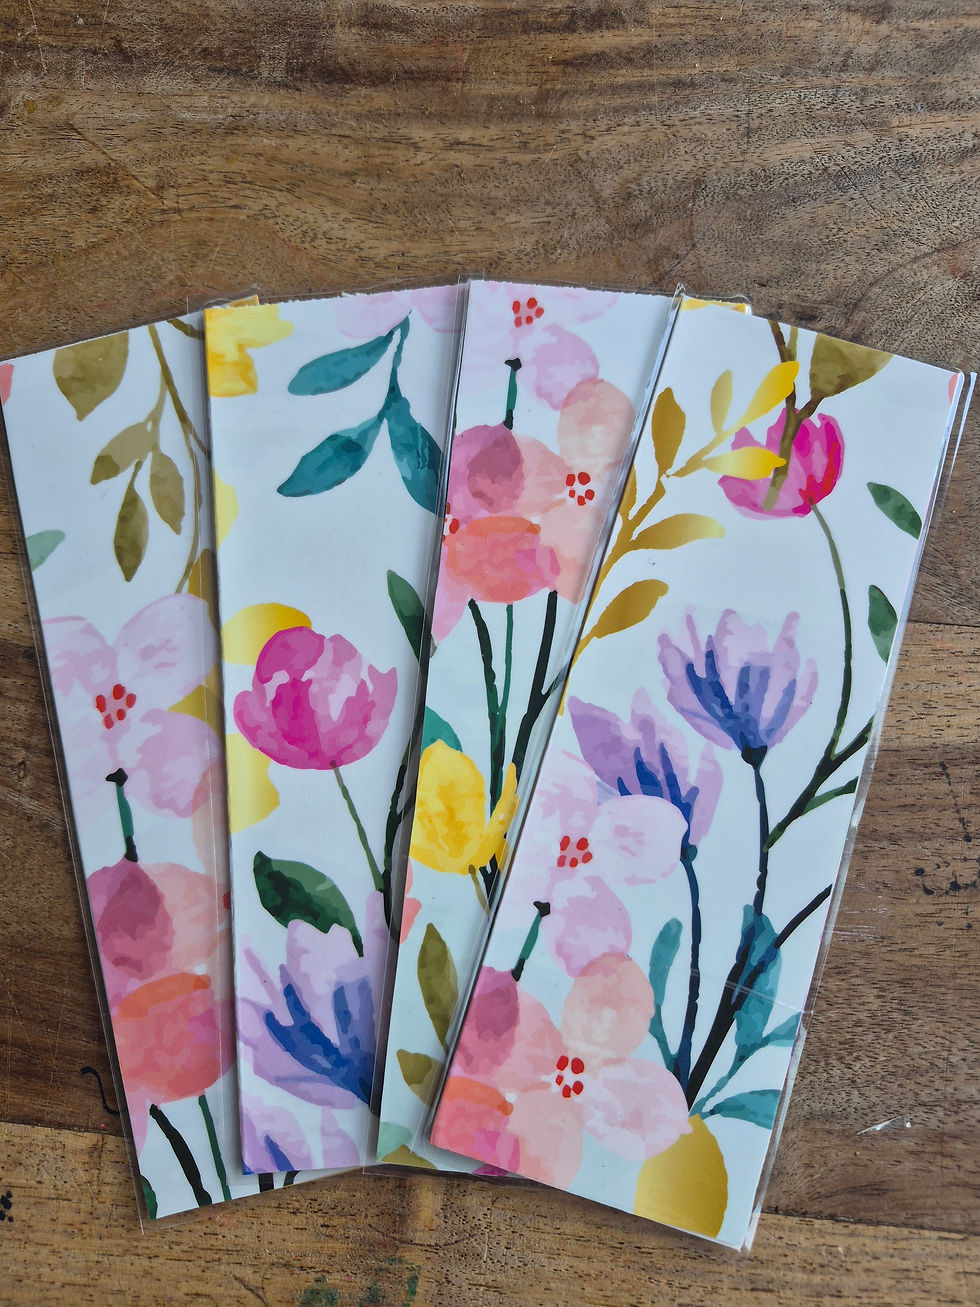
This no-waste craft idea was born from a real moment at home. After using the front and back panels of a floral gift bag to make DIY framed wall art for my living room, I was left with the two side strips. They were far too pretty to bin — so I laminated them into bookmarks instead. The result was four beautiful, personalised bookmarks that cost absolutely nothing.
Whether you are looking for a quick budget craft for adults, a rainy-day activity for kids, or a thoughtful handmade gift idea, this upcycled bookmark project ticks every box. It requires no special skills, no extra spending, and produces something genuinely lovely at the end.
Why Make DIY Bookmarks from a Gift Bag?
Gift bags are made from thick, beautifully designed card or coated paper — which happens to be ideal bookmark material. The side panels in particular are naturally long and narrow, meaning very little cutting is needed. Here is why this project is worth doing:
Zero waste — uses scraps that would otherwise be recycled or binned
Completely free to make — no extra materials beyond a laminator and pouch
Ready in under 10 minutes from start to finish
Makes a thoughtful, personalised handmade gift for teachers, friends, or family
A brilliant way to teach children about upcycling and reducing waste
Works with any patterned gift bag — floral, geometric, seasonal, or themed
This is the kind of no-waste project that reminds you to look at everyday packaging with fresh eyes. The side panels most people overlook are, in fact, the perfect shape and size for bookmarks — barely any trimming needed.
What You Need to Make Upcycled Gift Bag Bookmarks
The beauty of this craft is how little it requires. You will need:
Leftover side panels from a gift bag (any pattern or design)
Scissors or a paper trimmer (for clean, straight edges)
A laminator and laminating pouches (A4 or A5 size works well)
Optional: a hole punch and ribbon, baker's twine, or a tassel for finishing
Optional: a Cricut machine and adhesive vinyl to personalise with names
Tip: Matte paper gift bags laminate more easily than glossy ones. If your bag has a high-gloss coating, the laminate may not adhere as smoothly — but it will still produce a functional and pretty bookmark.
How to Make Floral Bookmarks from a Gift Bag: Step-by-Step Tutorial
Step 1: Save the Side Panels from Your Gift Bag
The next time you open or use a gift bag, set the two narrow side panels to one side rather than recycling the whole thing. These strips are often overlooked, but they are practically bookmark-shaped already — long, narrow, and printed with the same design as the rest of the bag.
In this project, I had already used the main front and back panels of my floral gift bag to create a framed wall art piece for the living room. The sides were what remained — and they were perfect for bookmarks.

Step 2: Cut Your Bookmarks to Size
Cut each side panel into bookmark-sized rectangles. A standard bookmark measures roughly 5–6 cm wide by 15–20 cm tall, but adjust this depending on what your panels allow. Aim to include a nice portion of the design in each cut piece.
Use a paper trimmer rather than scissors for the cleanest, straightest cuts — this makes a significant difference to the professional finish. From two narrow side panels, I cut four bookmarks with no waste at all.
Step 3: Laminate the Bookmarks
Slide each bookmark into a laminating pouch and run it through your laminator. Laminating does two important things: it makes the bookmark significantly sturdier, and it protects the design from bending, wear, and moisture over time. Laminated bookmarks are also water-resistant — perfect for humid environments or little hands.
Once laminated, use scissors to trim carefully around each bookmark, leaving a small 2–3 mm border of laminate on all sides. This is important — cutting right to the edge of the card risks the pouch separating over time.

Step 4: Finish and Personalise (Optional)
Your bookmarks are now complete! If you would like to take them further, here are a few finishing ideas:
Punch a hole at the top and thread through ribbon, baker's twine, or a tassel
Use a Cricut machine and adhesive vinyl to add a personalised name — ideal for gifts
Keep them plain and minimal — sometimes the design really does speak for itself
I chose to keep mine simple. Once laminated, the floral design looked clean, polished, and completely finished — no extras needed.
Handmade Gift Idea: Who Would Love These Upcycled Bookmarks?
Because these bookmarks cost virtually nothing to make, they are one of the best budget handmade gift ideas going — especially when they look as lovely as these do. Here are some perfect recipients:
Teachers at end of term — personalise with a name for an extra-special touch
Children who love reading — let them pick their favourite patterned gift bag to use
Book lovers — pop inside a book-themed present as a sweet handmade addition
Eco-conscious friends who appreciate thoughtful, low-waste gifts
Yourself — sometimes treating yourself to something pretty and functional is enough!
These bookmarks also make a sweet addition to a book hamper, a reading corner gift bag, or an end-of-year classroom gift. They look far more expensive than they are — which is always the goal with handmade gifts on a budget.
A True No-Waste Craft: Using Every Bit of the Gift Bag
One of the most satisfying things about this project is just how little was wasted. Here is how every single part of the same floral gift bag was put to use:
Front and back panels → DIY framed floral wall art for the living room
Side panels → four laminated floral bookmarks (this project!)
Ribbon handles → saved for future craft projects and wrapping
Absolutely nothing went in the bin. It is a simple reminder that the most overlooked scraps are often the most useful — and that a little creativity goes a long way when you are crafting on a budget.
Other Creative Uses for Gift Bag Scraps
Once you start looking at gift bags as a craft supply, it is hard to stop. The thick, patterned card is surprisingly versatile. Here are more ideas for using up every scrap:
Gift tags — punch a hole and add some twine for instant handmade tags
Decoupage art or framed panels — ideal for budget home decor projects
Paper beads — roll strips tightly around a cocktail stick for lightweight jewellery
Envelope liners — cut to size for a beautiful patterned interior
Junk journal pages — add texture and colour to any mixed-media journal
Small folded cards — cut and fold into handmade note cards or mini greetings cards
Save This No-Waste Craft for Later
If you love no-waste crafts, budget home projects, and handmade gift ideas, save this post to your Pinterest boards so you can find it again easily. You can search for 'DIY bookmarks from gift bags', 'upcycled paper crafts UK', or 'no-waste craft ideas for kids' to find this project and more.
Over on the blog you will also find related no-waste ideas including how to use gift bag panels to make budget framed wall art for your home, and plenty more upcycled craft projects for adults and children alike.
Ready to Give It a Go?
The next time you find yourself with leftover gift bag panels, do not reach for the recycling bin. Those narrow side strips might just make the most beautiful, budget-friendly bookmarks you own — and they cost you absolutely nothing.
This is the kind of simple, satisfying no-waste craft that takes minutes, uses what you already have, and produces something you will genuinely use and love. Give it a try — and if you do, let me know in the comments below which gift bag design you used!


Comments